How to Point a Domain to Hosting: A Simple DNS Guide for Beginners
How to Point a Domain to Hosting in 5 Easy Steps
You bought a domain name and hosting plan. Now you need to connect them so people can open your website online.
This process is called pointing a domain to hosting. It may sound technical, but it is usually simple. In most cases, you only need to update your domain’s nameservers or DNS records.
In this guide, you will learn how to point a domain to hosting step by step. We will explain everything in easy English, including nameservers, DNS records, propagation time, and common problems.
What Does Pointing a Domain to Hosting Mean?
A domain name is your website address, such as yourbusiness.com.
Hosting is the server where your website files, images, database, and emails are stored.
When you point a domain to hosting, you tell the internet where your website files are located. After the connection is complete, visitors can type your domain name into a browser and see your website.
Think of it like this:
Your domain is the address of a house.
Your hosting is the actual house.
DNS helps visitors reach the right house by using the address.
Without connecting the domain and hosting, your website will not open through your chosen domain name.
What You Need Before You Start
Before you connect your domain to hosting, make sure you have these details:
Your domain registrar login details.
Your hosting account login details.
The nameservers provided by your hosting company.
Your hosting server IP address, if you plan to use A records.
A website already installed or uploaded to your hosting account.
If you use GenShift for both your domain and hosting, the setup may be easier because you can manage both services from one place.
Two Ways to Point a Domain to Hosting
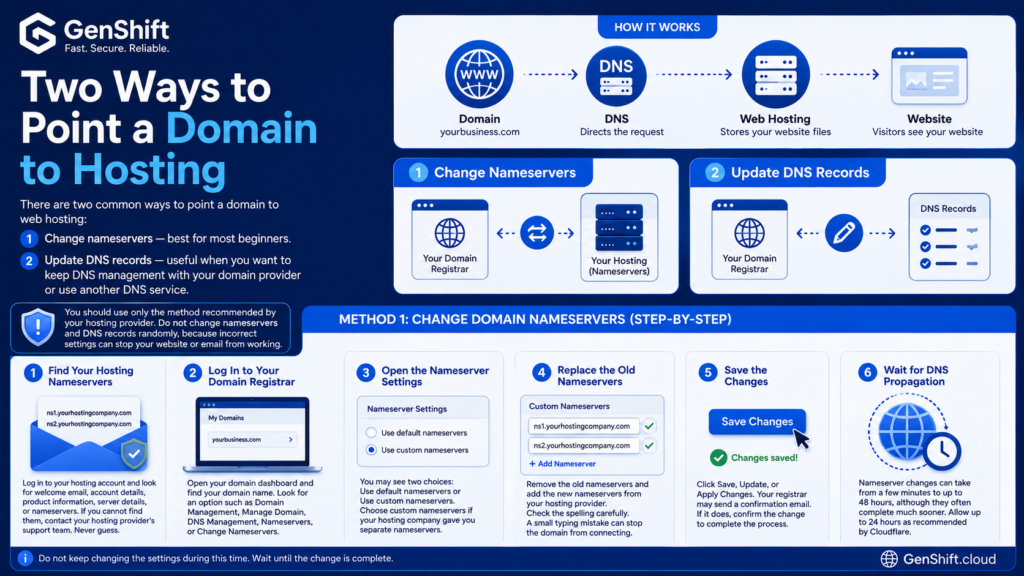
There are two common ways to point a domain to web hosting:
Change nameservers — best for most beginners.
Update DNS records — useful when you want to keep DNS management with your domain provider or use another DNS service.
You should use only the method recommended by your hosting provider. Do not change nameservers and DNS records randomly, because incorrect settings can stop your website or email from working.
Method 1: Change Domain Nameservers
Nameservers are part of the DNS system. They tell the internet which company manages the DNS records for your domain.
Your hosting provider normally gives you two nameservers. They may look similar to this:
Check the spelling carefully. A small typing mistake can stop the domain from connecting correctly.
Step 5: Save the Changes
Click Save, Update, or Apply Changes.
Your registrar may send a confirmation email. If it does, confirm the change to complete the process.
Step 6: Wait for DNS Propagation
After you change nameservers, the update needs time to spread across DNS systems worldwide. This is called DNS propagation.
Nameserver changes can take from a few minutes to up to 48 hours, although they often complete much sooner. Cloudflare recommends allowing up to 24 hours for a registrar to update nameservers, while propagation can take longer in some cases.
Do not keep changing the settings during this time. Wait until the change is complete.
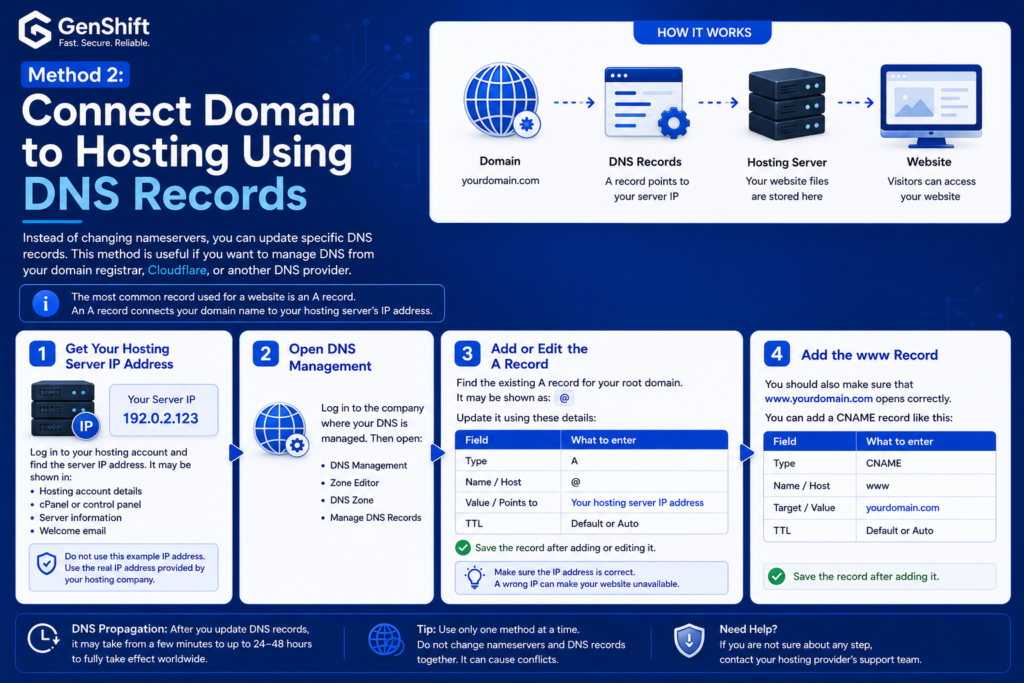
Method 2: Connect Domain to Hosting Using DNS Records
Instead of changing nameservers, you can update specific DNS records. This method is useful if you want to manage DNS from your domain registrar, Cloudflare, or another DNS provider.
The most common record used for a website is an A record.
An A record connects your domain name to your hosting server’s IP address.
Step 1: Get Your Hosting Server IP Address
Log in to your hosting account and find the server IP address. It may be shown in:
Hosting account details.
cPanel or control panel.
Server information.
Welcome email.
It may look like this:
192.0.2.123
Do not use this example IP address. Use the real IP address provided by your hosting company.
Step 2: Open DNS Management
Log in to the company where your DNS is managed. Then open:
DNS Management.
Zone Editor.
DNS Zone.
Manage DNS Records.
Step 3: Add or Edit the A Record
Find the existing A record for your root domain. It may be shown as:
@
Update it using these details:
Field
What to enter
Type
A
Name / Host
@
Value / Points to
Your hosting server IP address
TTL
Default or Auto
Save the record after adding or editing it.
Find the existing A record for your root domain. It may be shown as:
@
Update it using these details:
Field
What to enter
Type
A
Name / Host
@
Value / Points to
Your hosting server IP address
TTL
Default or Auto
Save the record after adding or editing it.
Step 4: Add the www Record
You should also make sure that www.yourdomain.com opens correctly.
You can add a CNAME record like this:
Field
What to enter
Type
CNAME
Name / Host
www
Target / Value
yourdomain.com
TTL
Default or Auto
This sends visitors from the www version of your domain to the main domain.
Which Method Should You Use?
For most beginners, changing nameservers is the easiest method.
Use nameservers when
Use DNS records when
Your hosting provider manages DNS
You want to manage DNS yourself
You want a simple setup
You use Cloudflare or another DNS provider
You use the host’s email and website services
You need special email or third-party records
You do not need advanced DNS control
You want more control over individual records
If you are unsure, ask your hosting provider which method they recommend.
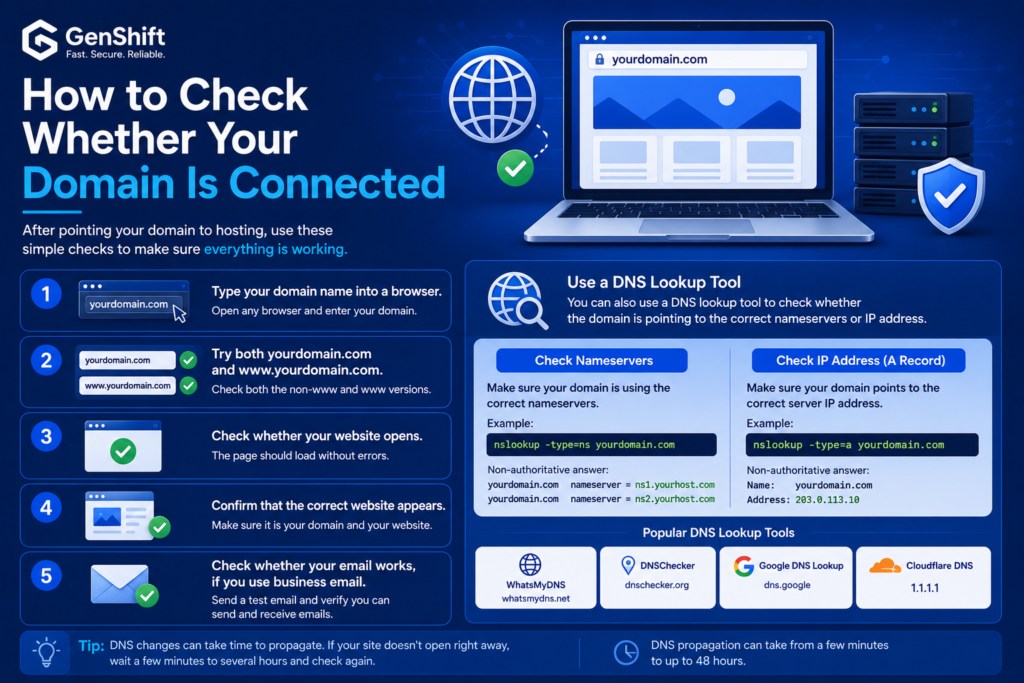
How to Check Whether Your Domain Is Connected
After pointing your domain to hosting, use these simple checks:
Type your domain name into a browser.
Try both yourdomain.com and www.yourdomain.com.
Check whether your website opens.
Confirm that the correct website appears.
Check whether your email works, if you use business email.
You can also use a DNS lookup tool to check whether the domain is pointing to the correct nameservers or IP address.
Common Problems and Easy Fixes
The Website Is Not Opening
If your website does not open immediately, wait for DNS propagation. Nameserver changes can take up to 48 hours in some cases.developers.cloudflare+1
Also check that:
You entered the nameservers correctly.
You used the correct hosting IP address.
The domain is active and not expired.
Your hosting account is active.
Your website files are uploaded to the correct folder.
A Different Website Opens
This often happens when an old DNS record is still active or the domain points to a previous hosting account.
Check your A record, nameservers, and hosting account settings. Remove old or incorrect DNS records only if you understand what they do.
The Domain Opens Without www but Not With www
Add a CNAME record for www that points to your main domain. Your hosting provider can also help you create a redirect between the www and non-www versions.
Email Stops Working After Changing Nameservers
Changing nameservers may remove or replace your old email settings. Before changing nameservers, write down important MX, SPF, and DKIM records if you use email from another provider.
If your email stops working, contact the email provider or hosting support team to restore the required records.
Important Tips Before Changing DNS
Take screenshots of your current DNS records before making changes.
Do not delete records unless you know what they do.
Use only the nameservers or IP address provided by your host.
Avoid changing settings repeatedly during DNS propagation.
Check email records carefully if you use Google Workspace, Microsoft 365, or another email service.
Keep domain auto-renewal enabled so you do not lose your domain.
Final recommendation
How do I point a domain to hosting?
You can point a domain to hosting by changing the domain’s nameservers to your hosting provider’s nameservers or by updating the A record with your hosting server’s IP address.
How long does it take to connect a domain to hosting?
It can take a few minutes to 48 hours. Many updates complete faster, but DNS propagation time depends on registrars, DNS providers, and cache settings.
Do I need to change nameservers or A records?
Use the method recommended by your hosting provider. Nameservers are easier for beginners, while A records give more control when DNS is managed elsewhere.
Will changing nameservers affect my email?
It can. If your email uses separate services such as Google Workspace or Microsoft 365, make sure the needed MX, SPF, and DKIM records are added to the new DNS provider before or after the change.